
Red Flag Alert — Digital IDV & AML
Version 2
Run Digital ID Verification (IDV) and Anti-Money Laundering (AML) checks on your Salesforce contact and account records. Version 2 introduces a guided check wizard, additional check types, ongoing monitoring and more.
Overview
The Red Flag Alert Digital IDV & AML app lets you verify identities and run Anti-Money Laundering checks on your contact and account records, directly inside Salesforce. The completed check reports are attached back to the record for your audit trail.
New in version 2:
- A guided, three-step New Check wizard
- Multiple check types in one request — PSAM (PEPs, Sanctions & Adverse Media), IDV, AML, Bank Account Verification and Phone Verification
- Ongoing monitoring of PSAM checks for future changes
- Options to exclude adverse media and send SMS notifications
- Richer applicant details — document type/number/expiry, country of origin, and full address history
- Override results and generate a PDF check report
The IDV & AML panel
Once installed, the app appears on your contact or account record. The panel summarises the latest check and gives you the action buttons.
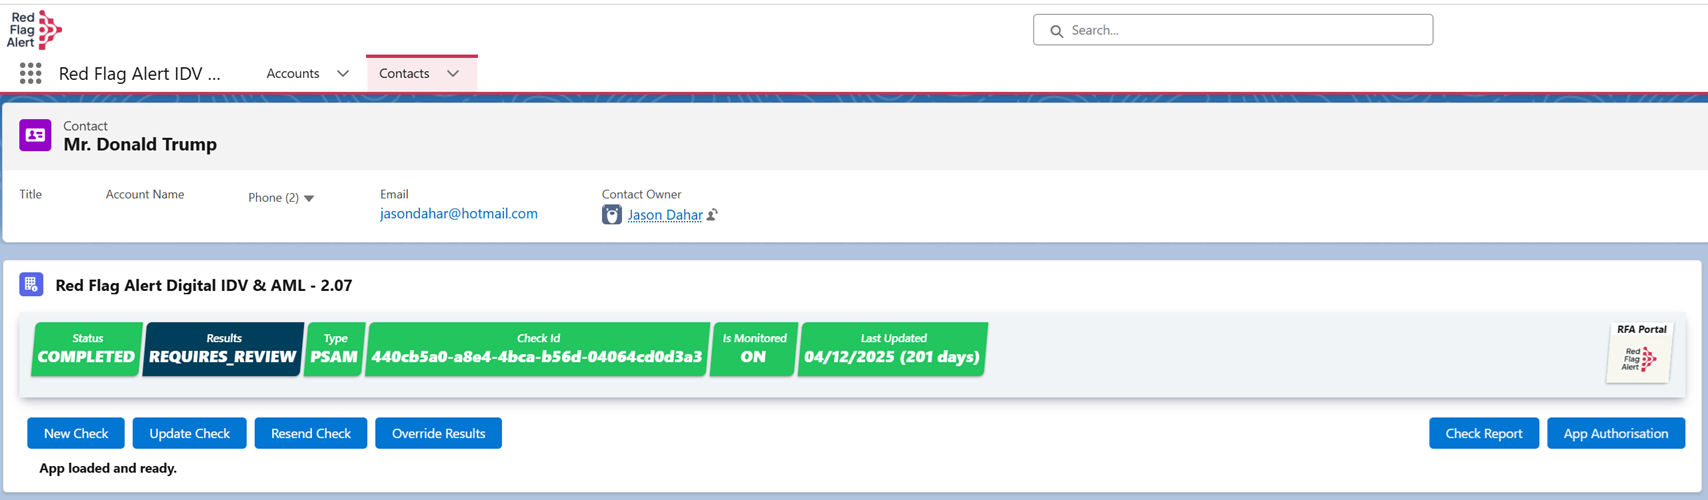
The status boxes show:
- Status — the check progress: REQUESTED, CREATED, STARTED or COMPLETED
- Results — the outcome: AWAITING, PASSED, CONSIDER or FAILED
- Type — the check type(s) performed
- Check Id — the Red Flag Alert reference for the check
- Is Monitored — whether the check is being monitored for ongoing changes
- Last Updated — when the record was last refreshed
The action buttons are: New Check, Update Check, Resend Check, Override Results, Check Report and App Authorisation. The Red Flag Alert Portal link opens the matching check in your Red Flag Alert portal.
Authorising the app
Before running checks, click App Authorisation and connect the app to your Red Flag Alert portal:
- Enter your Red Flag Alert Portal Username and Password and click Save.
- Optionally set a default Message to Customer and choose whether to Send IDV/AML Email and Send IDV/AML SMS.
This screen also shows your remaining credits, the app version and subscription status, and a link to Field Mapping (see below).
Creating a new check
Click New Check to open the wizard. Work through the three steps using Next / Back, then Create Check.
Step 1 — Check details
Configure the settings for your check.
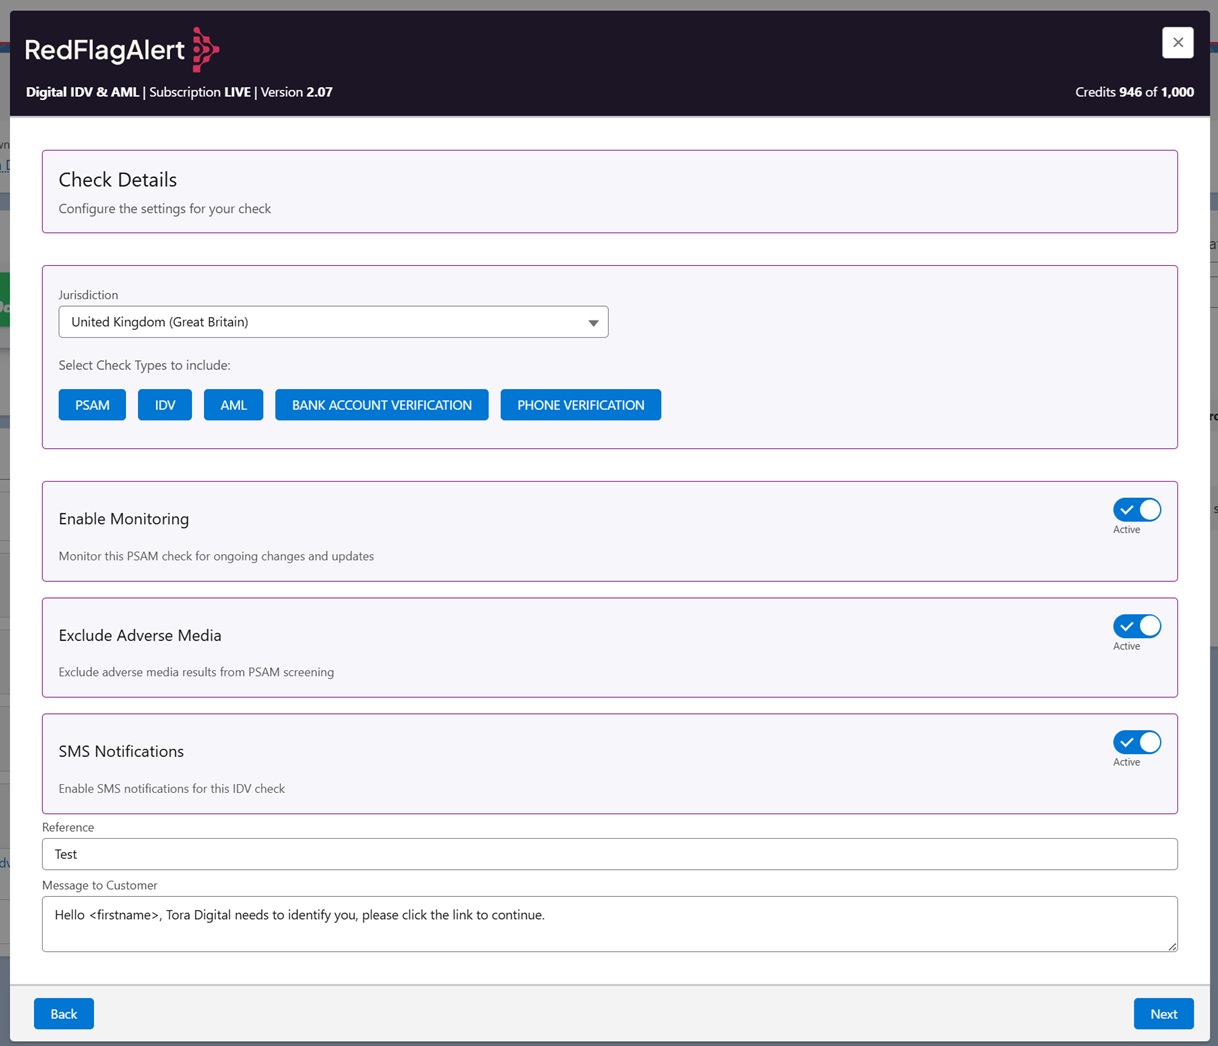
- Choose the Jurisdiction.
- Select one or more check types — PSAM, IDV, AML, Bank Account Verification, Phone Verification. The types available depend on your subscription and the selected jurisdiction.
- Enable Monitoring — monitor a PSAM check for ongoing changes and updates.
- Exclude Adverse Media — exclude adverse media results from PSAM screening.
- SMS Notifications — send the IDV check to the customer by SMS.
- Add an optional Reference and Message to Customer.
Step 2 — Personal details
Enter the applicant's details. Fields marked * are required.
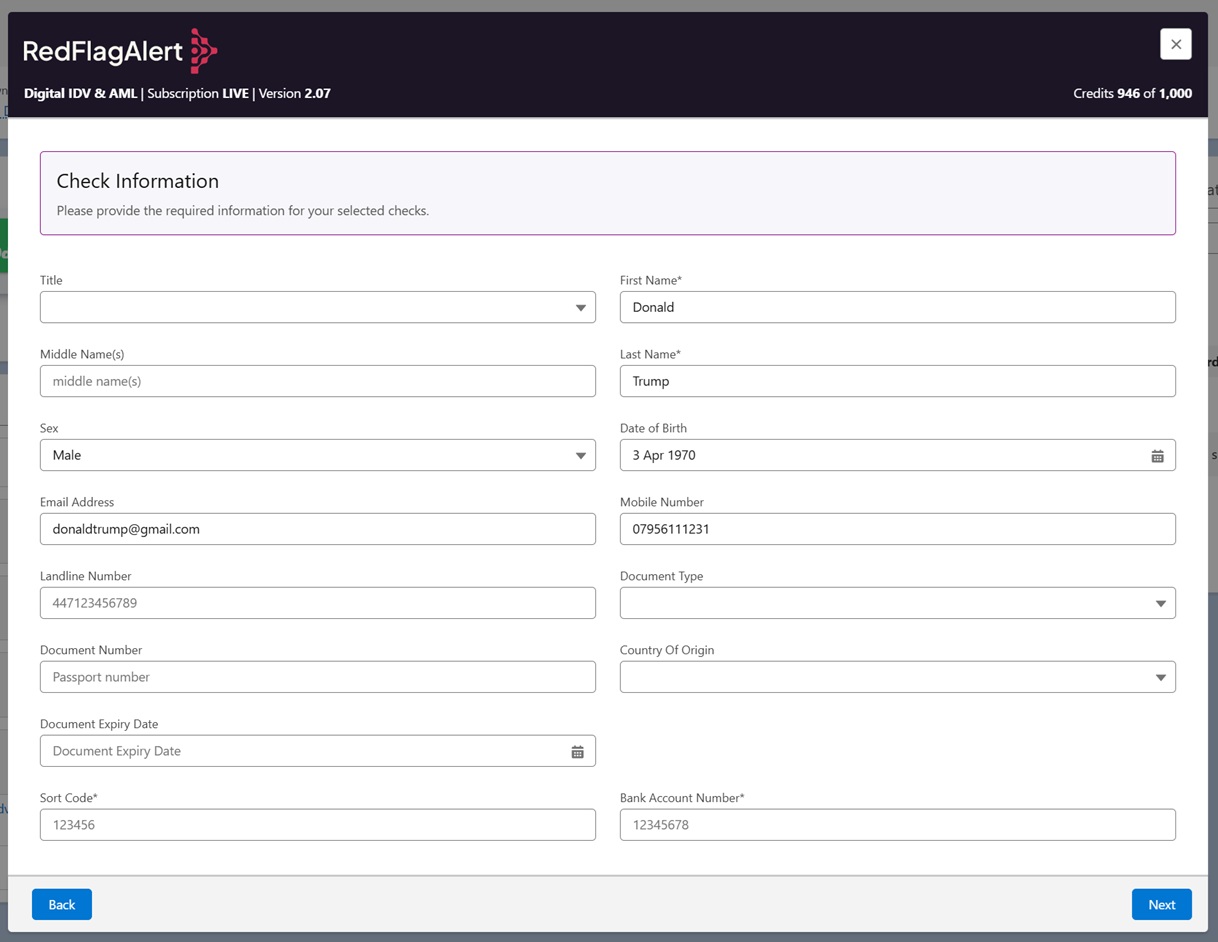
- Title, First Name*, Middle Name(s), Last Name*
- Sex and Date of Birth
- Email, Mobile and Landline numbers
- Document Type, Document Number, Country of Origin and Document Expiry Date
- If Bank Account Verification was selected: Sort Code* and Bank Account Number*
Use Save Contact Details to write these back to the Salesforce record.
Step 3 — Address history
Add the applicant's current and previous addresses.
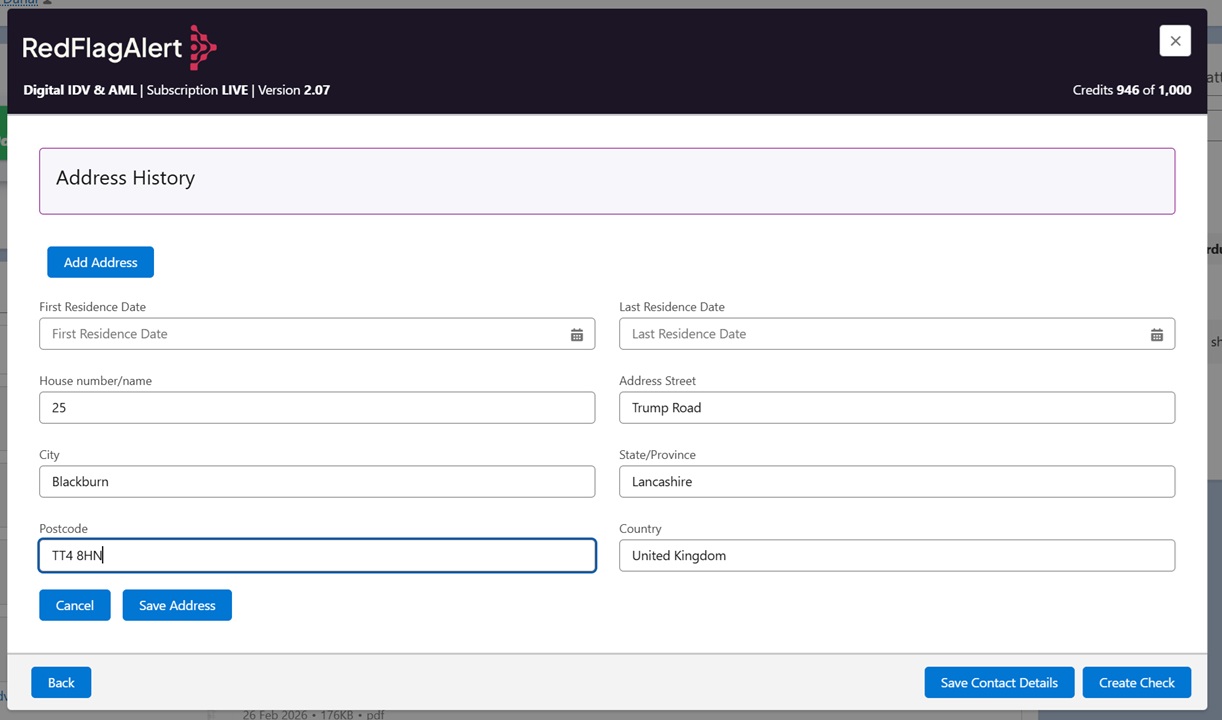
- Click Add Address and enter the address details — house number/name, street, city, state/province, postcode and country.
- Set the First Residence Date and Last Residence Date for each address.
- Saved addresses are listed and can be removed with the delete icon.
When all steps are complete, click Create Check to submit it to Red Flag Alert.
Managing checks
- Update Check — fetch the latest status and result for the current check.
- Resend Check — resend the IDV/AML request (email/SMS) to the customer.
- Override Results — manually set the result (e.g. PASSED, CONSIDER, FAILED) where appropriate.
- Check Report — generate a PDF report of the completed check, attached to the record as a Content Document.
Field mapping
From App Authorisation → Field Mapping, map your Salesforce account fields to the Red Flag Alert resources so data is written to the right place.
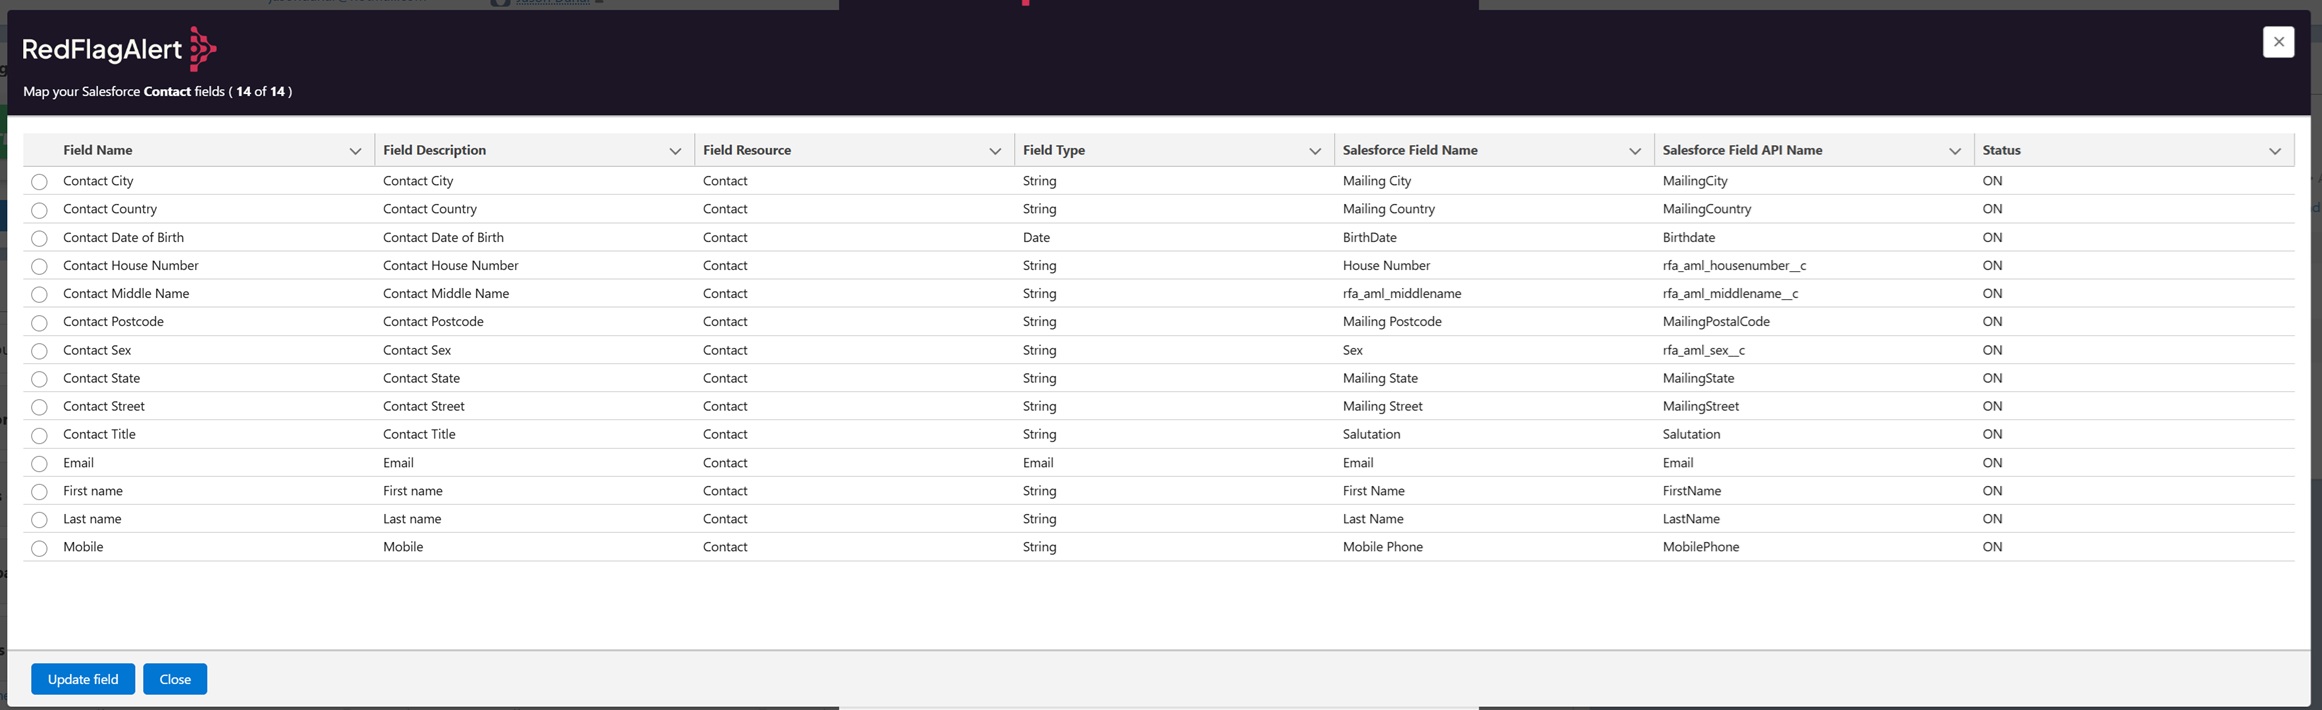
- The table lists each field: Field Name, Description, Resource, Type, the mapped Salesforce Field Name / API Name, and its Status.
- Select a row, choose the Salesforce field to map it to, set the Status on or off, and Save.
- The header shows how many fields are mapped of the total.
Before you install
Have you read the user guide and installation instructions for this app?
Please make sure you've reviewed them before installing.